[{"CategoryType":0,"ParentID":6697,"Id":6698,"Name":"Main Documentation","FriendlyName":"main-documentation","Level":0,"Children":4,"Link":null,"Destination":null,"PostFile":null},{"CategoryType":0,"ParentID":6698,"Id":6701,"Name":"Getting Started","FriendlyName":"getting-started","Level":1,"Children":2,"Link":null,"Destination":null,"PostFile":null},{"CategoryType":0,"ParentID":6701,"Id":6705,"Name":"About Koolay","FriendlyName":"about-koolay","Level":2,"Children":0,"Link":null,"Destination":null,"PostFile":null},{"CategoryType":0,"ParentID":6701,"Id":6706,"Name":"Koolay Subscriptions","FriendlyName":"koolay-subscriptions","Level":2,"Children":0,"Link":null,"Destination":null,"PostFile":null},{"CategoryType":0,"ParentID":6698,"Id":23536,"Name":"New User Onboarding Guide","FriendlyName":"new-user-onboarding-guide","Level":1,"Children":0,"Link":null,"Destination":null,"PostFile":null},{"CategoryType":0,"ParentID":6698,"Id":6886,"Name":"How to manage Modules","FriendlyName":"how-to-manage-modules","Level":1,"Children":22,"Link":null,"Destination":null,"PostFile":null},{"CategoryType":0,"ParentID":6886,"Id":24439,"Name":"Account Module","FriendlyName":"account-module","Level":2,"Children":0,"Link":null,"Destination":null,"PostFile":null},{"CategoryType":0,"ParentID":6886,"Id":6889,"Name":"Category Module","FriendlyName":"category-module","Level":2,"Children":0,"Link":null,"Destination":null,"PostFile":null},{"CategoryType":0,"ParentID":6886,"Id":6888,"Name":"Content Module","FriendlyName":"content-module","Level":2,"Children":0,"Link":null,"Destination":null,"PostFile":null},{"CategoryType":0,"ParentID":6886,"Id":6893,"Name":"Gallery Module","FriendlyName":"gallery-module","Level":2,"Children":0,"Link":null,"Destination":null,"PostFile":null},{"CategoryType":0,"ParentID":6886,"Id":6890,"Name":"Banner Module","FriendlyName":"banner-module","Level":2,"Children":0,"Link":null,"Destination":null,"PostFile":null},{"CategoryType":0,"ParentID":6886,"Id":6894,"Name":"Popup Module","FriendlyName":"popup-module","Level":2,"Children":0,"Link":null,"Destination":null,"PostFile":null},{"CategoryType":0,"ParentID":6886,"Id":6895,"Name":"Survey Module","FriendlyName":"survey-module","Level":2,"Children":0,"Link":null,"Destination":null,"PostFile":null},{"CategoryType":0,"ParentID":6886,"Id":6896,"Name":"Events Module","FriendlyName":"events-module","Level":2,"Children":0,"Link":null,"Destination":null,"PostFile":null},{"CategoryType":0,"ParentID":6886,"Id":6897,"Name":"Members Module","FriendlyName":"members-module","Level":2,"Children":0,"Link":null,"Destination":null,"PostFile":null},{"CategoryType":0,"ParentID":6886,"Id":44524,"Name":"E-Guide Module","FriendlyName":"e-guide-module","Level":2,"Children":0,"Link":null,"Destination":null,"PostFile":null},{"CategoryType":0,"ParentID":6886,"Id":6898,"Name":"Staff Module","FriendlyName":"staff-module","Level":2,"Children":0,"Link":null,"Destination":null,"PostFile":null},{"CategoryType":0,"ParentID":6886,"Id":6899,"Name":"Bulletin Module","FriendlyName":"bulletin-module","Level":2,"Children":0,"Link":null,"Destination":null,"PostFile":null},{"CategoryType":0,"ParentID":6886,"Id":6900,"Name":"Email List Module","FriendlyName":"email-list-module","Level":2,"Children":0,"Link":null,"Destination":null,"PostFile":null},{"CategoryType":0,"ParentID":6886,"Id":6901,"Name":"Forms Module","FriendlyName":"forms-module","Level":2,"Children":3,"Link":null,"Destination":null,"PostFile":null},{"CategoryType":0,"ParentID":6901,"Id":24969,"Name":"Beginning","FriendlyName":"beginning","Level":3,"Children":0,"Link":null,"Destination":null,"PostFile":null},{"CategoryType":0,"ParentID":6901,"Id":24820,"Name":"Forms","FriendlyName":"forms","Level":3,"Children":0,"Link":null,"Destination":null,"PostFile":null},{"CategoryType":0,"ParentID":6901,"Id":24821,"Name":"Applications","FriendlyName":"applications","Level":3,"Children":0,"Link":null,"Destination":null,"PostFile":null},{"CategoryType":0,"ParentID":6886,"Id":6902,"Name":"AI Settings Module","FriendlyName":"ai-settings-module","Level":2,"Children":0,"Link":null,"Destination":null,"PostFile":null},{"CategoryType":0,"ParentID":6886,"Id":6903,"Name":"Security Module","FriendlyName":"security-module","Level":2,"Children":0,"Link":null,"Destination":null,"PostFile":null},{"CategoryType":0,"ParentID":6886,"Id":6904,"Name":"Tools Module","FriendlyName":"tools-module","Level":2,"Children":3,"Link":null,"Destination":null,"PostFile":null},{"CategoryType":0,"ParentID":6904,"Id":14431,"Name":"Image Editor","FriendlyName":"image-editor","Level":3,"Children":0,"Link":null,"Destination":null,"PostFile":null},{"CategoryType":0,"ParentID":6904,"Id":14432,"Name":"Code Editor","FriendlyName":"code-editor","Level":3,"Children":0,"Link":null,"Destination":null,"PostFile":null},{"CategoryType":0,"ParentID":6904,"Id":14433,"Name":"File Manager","FriendlyName":"file-manager","Level":3,"Children":0,"Link":null,"Destination":null,"PostFile":null},{"CategoryType":0,"ParentID":6886,"Id":6905,"Name":"Settings Module","FriendlyName":"settings-module","Level":2,"Children":7,"Link":null,"Destination":null,"PostFile":null},{"CategoryType":0,"ParentID":6905,"Id":25415,"Name":"Beginning","FriendlyName":"beginning","Level":3,"Children":0,"Link":null,"Destination":null,"PostFile":null},{"CategoryType":0,"ParentID":6905,"Id":25416,"Name":"Site Configurations","FriendlyName":"site-configurations","Level":3,"Children":0,"Link":null,"Destination":null,"PostFile":null},{"CategoryType":0,"ParentID":6905,"Id":25417,"Name":"System Settings","FriendlyName":"system-settings","Level":3,"Children":0,"Link":null,"Destination":null,"PostFile":null},{"CategoryType":0,"ParentID":6905,"Id":25418,"Name":"Event Log","FriendlyName":"event-log","Level":3,"Children":0,"Link":null,"Destination":null,"PostFile":null},{"CategoryType":0,"ParentID":6905,"Id":25419,"Name":"HomePage Settings","FriendlyName":"homepage-settings","Level":3,"Children":0,"Link":null,"Destination":null,"PostFile":null},{"CategoryType":0,"ParentID":6905,"Id":25420,"Name":"Customer Language","FriendlyName":"customer-language","Level":3,"Children":0,"Link":null,"Destination":null,"PostFile":null},{"CategoryType":0,"ParentID":6905,"Id":25422,"Name":"Site Constants","FriendlyName":"site-constants","Level":3,"Children":0,"Link":null,"Destination":null,"PostFile":null},{"CategoryType":0,"ParentID":6886,"Id":31648,"Name":"Community Module","FriendlyName":"community-module","Level":2,"Children":0,"Link":null,"Destination":null,"PostFile":null},{"CategoryType":0,"ParentID":6886,"Id":28629,"Name":"Feature Track Module","FriendlyName":"feature-track-module","Level":2,"Children":0,"Link":null,"Destination":null,"PostFile":null},{"CategoryType":0,"ParentID":6886,"Id":31647,"Name":"Blog Module","FriendlyName":"blog-module","Level":2,"Children":0,"Link":null,"Destination":null,"PostFile":null},{"CategoryType":0,"ParentID":6886,"Id":35746,"Name":"Social Media Posting Module","FriendlyName":"social-media-posting-module","Level":2,"Children":0,"Link":null,"Destination":null,"PostFile":null},{"CategoryType":0,"ParentID":6698,"Id":6891,"Name":"Questions \u0026amp; Answers","FriendlyName":"questions-answers","Level":1,"Children":14,"Link":null,"Destination":null,"PostFile":null},{"CategoryType":0,"ParentID":6891,"Id":20480,"Name":"Koolay Console","FriendlyName":"koolay-console","Level":2,"Children":0,"Link":null,"Destination":null,"PostFile":null},{"CategoryType":0,"ParentID":6891,"Id":20481,"Name":"Category Module","FriendlyName":"category","Level":2,"Children":0,"Link":null,"Destination":null,"PostFile":null},{"CategoryType":0,"ParentID":6891,"Id":20482,"Name":"Content Module","FriendlyName":"content","Level":2,"Children":0,"Link":null,"Destination":null,"PostFile":null},{"CategoryType":0,"ParentID":6891,"Id":20483,"Name":"Gallery Module","FriendlyName":"gallery","Level":2,"Children":0,"Link":null,"Destination":null,"PostFile":null},{"CategoryType":0,"ParentID":6891,"Id":20484,"Name":"Banner Module","FriendlyName":"banner","Level":2,"Children":0,"Link":null,"Destination":null,"PostFile":null},{"CategoryType":0,"ParentID":6891,"Id":20485,"Name":"Pop-up Module","FriendlyName":"pop-up","Level":2,"Children":0,"Link":null,"Destination":null,"PostFile":null},{"CategoryType":0,"ParentID":6891,"Id":20486,"Name":"Events Module","FriendlyName":"events","Level":2,"Children":0,"Link":null,"Destination":null,"PostFile":null},{"CategoryType":0,"ParentID":6891,"Id":20487,"Name":"Staff Module","FriendlyName":"staff","Level":2,"Children":0,"Link":null,"Destination":null,"PostFile":null},{"CategoryType":0,"ParentID":6891,"Id":20488,"Name":"Members Module","FriendlyName":"members","Level":2,"Children":0,"Link":null,"Destination":null,"PostFile":null},{"CategoryType":0,"ParentID":6891,"Id":20489,"Name":"Forms Module","FriendlyName":"forms","Level":2,"Children":0,"Link":null,"Destination":null,"PostFile":null},{"CategoryType":0,"ParentID":6891,"Id":20490,"Name":"Account Module","FriendlyName":"account","Level":2,"Children":0,"Link":null,"Destination":null,"PostFile":null},{"CategoryType":0,"ParentID":6891,"Id":20491,"Name":"Security Module","FriendlyName":"security","Level":2,"Children":0,"Link":null,"Destination":null,"PostFile":null},{"CategoryType":0,"ParentID":6891,"Id":20492,"Name":"Tools Module","FriendlyName":"tools","Level":2,"Children":0,"Link":null,"Destination":null,"PostFile":null},{"CategoryType":0,"ParentID":6891,"Id":20493,"Name":"Settings Module","FriendlyName":"settings","Level":2,"Children":0,"Link":null,"Destination":null,"PostFile":null},{"CategoryType":0,"ParentID":6697,"Id":6699,"Name":"Guides","FriendlyName":"guides","Level":0,"Children":1,"Link":null,"Destination":null,"PostFile":null},{"CategoryType":0,"ParentID":6699,"Id":6703,"Name":"Guides","FriendlyName":"guides","Level":1,"Children":1,"Link":null,"Destination":null,"PostFile":null},{"CategoryType":0,"ParentID":6703,"Id":6708,"Name":"Choosing the Right Subscription Plan","FriendlyName":"choosing-the-right-subscription-plan","Level":2,"Children":0,"Link":null,"Destination":null,"PostFile":null},{"CategoryType":0,"ParentID":6697,"Id":6700,"Name":"FAQ","FriendlyName":"faq","Level":0,"Children":1,"Link":null,"Destination":null,"PostFile":null},{"CategoryType":0,"ParentID":6700,"Id":6704,"Name":"FAQ","FriendlyName":"faq","Level":1,"Children":2,"Link":null,"Destination":null,"PostFile":null},{"CategoryType":0,"ParentID":6704,"Id":6710,"Name":"GENERAL","FriendlyName":"general","Level":2,"Children":0,"Link":null,"Destination":null,"PostFile":null},{"CategoryType":0,"ParentID":6704,"Id":6711,"Name":"Licensing","FriendlyName":"licensing","Level":2,"Children":0,"Link":null,"Destination":null,"PostFile":null},{"CategoryType":0,"ParentID":6697,"Id":6793,"Name":"Support","FriendlyName":"support","Level":0,"Children":3,"Link":"https://support.koolay.com","Destination":null,"PostFile":null},{"CategoryType":0,"ParentID":6793,"Id":6794,"Name":"Professional Support","FriendlyName":"professional-support","Level":1,"Children":0,"Link":null,"Destination":null,"PostFile":null},{"CategoryType":0,"ParentID":6793,"Id":6796,"Name":"Release Notes","FriendlyName":"release-notes","Level":1,"Children":0,"Link":null,"Destination":null,"PostFile":null},{"CategoryType":0,"ParentID":6793,"Id":6795,"Name":"Sending a Feedback","FriendlyName":"sending-a-feedback","Level":1,"Children":0,"Link":null,"Destination":null,"PostFile":null},{"CategoryType":0,"ParentID":6697,"Id":6875,"Name":"Legal","FriendlyName":"legal","Level":0,"Children":3,"Link":null,"Destination":null,"PostFile":null},{"CategoryType":0,"ParentID":6875,"Id":6876,"Name":"Privacy Policy","FriendlyName":"privacy-policy","Level":1,"Children":0,"Link":null,"Destination":null,"PostFile":null},{"CategoryType":0,"ParentID":6875,"Id":6877,"Name":"Terms of Service","FriendlyName":"terms-of-service","Level":1,"Children":0,"Link":null,"Destination":null,"PostFile":null},{"CategoryType":0,"ParentID":6875,"Id":6878,"Name":"Terms of Use","FriendlyName":"terms-of-use","Level":1,"Children":0,"Link":null,"Destination":null,"PostFile":null}]
6888
Accessing the Content Module
-
Locate the toolbar on the left side of the interface.
-
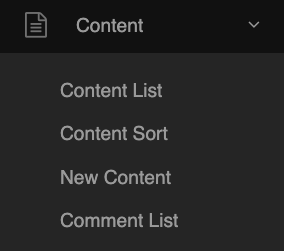
Click on the “Content” link within the toolbar to navigate to the Content management section.
Viewing the Content List
-
Navigate to the left-side toolbar.
-
Click the “Content” link and select the “Content List” option.
-
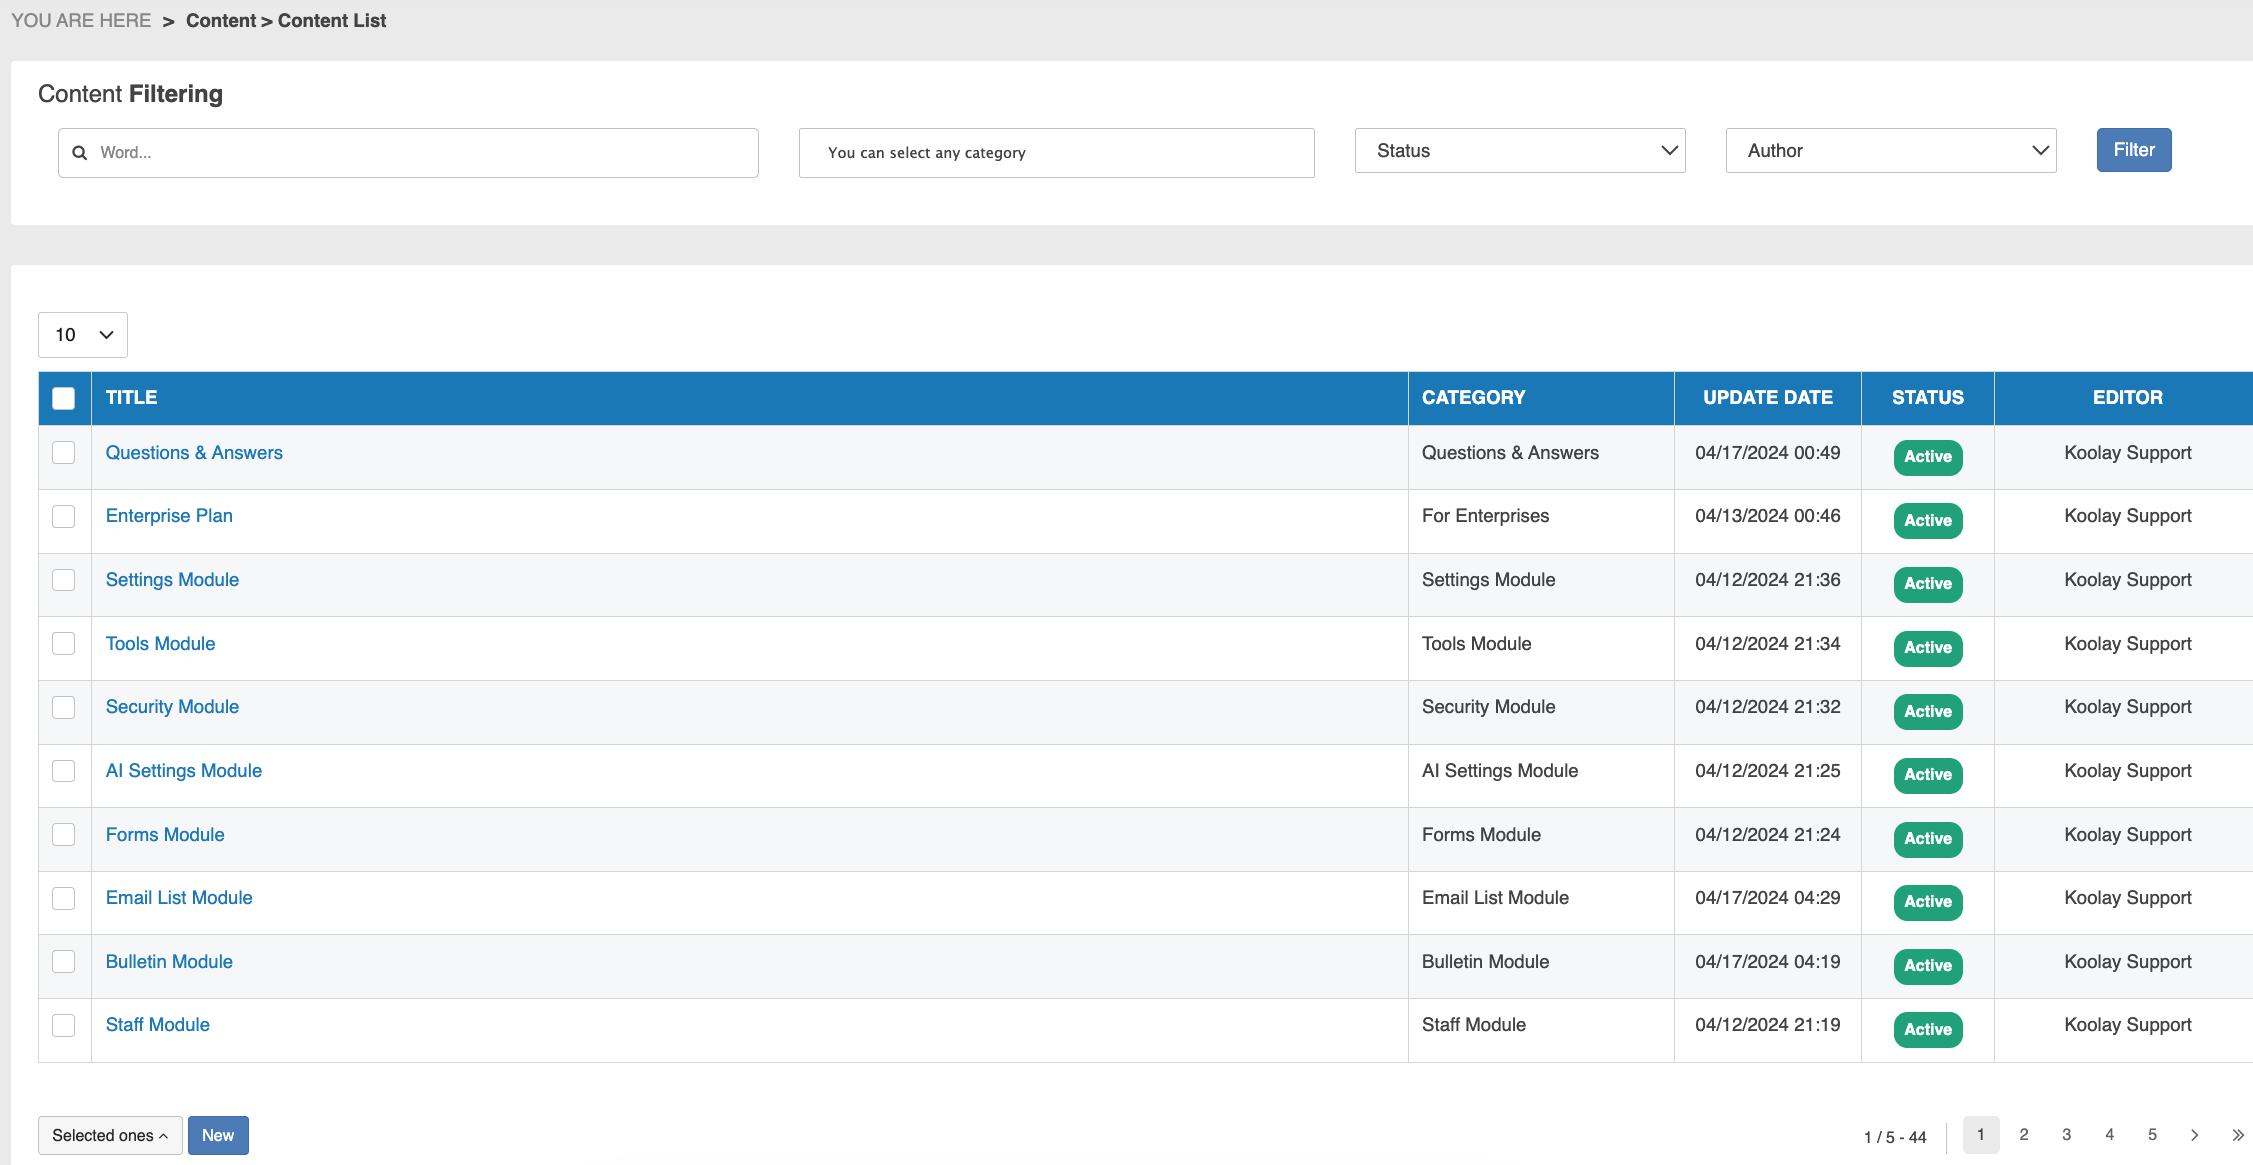
You will be presented with a list of content available within the system.
Editing Content
-
Log into the Koolay Console with your credentials.
-
Access the left-side toolbar.
-
Click on the “Content” link and select “Content List.”
-
Locate the content you wish to edit.
-
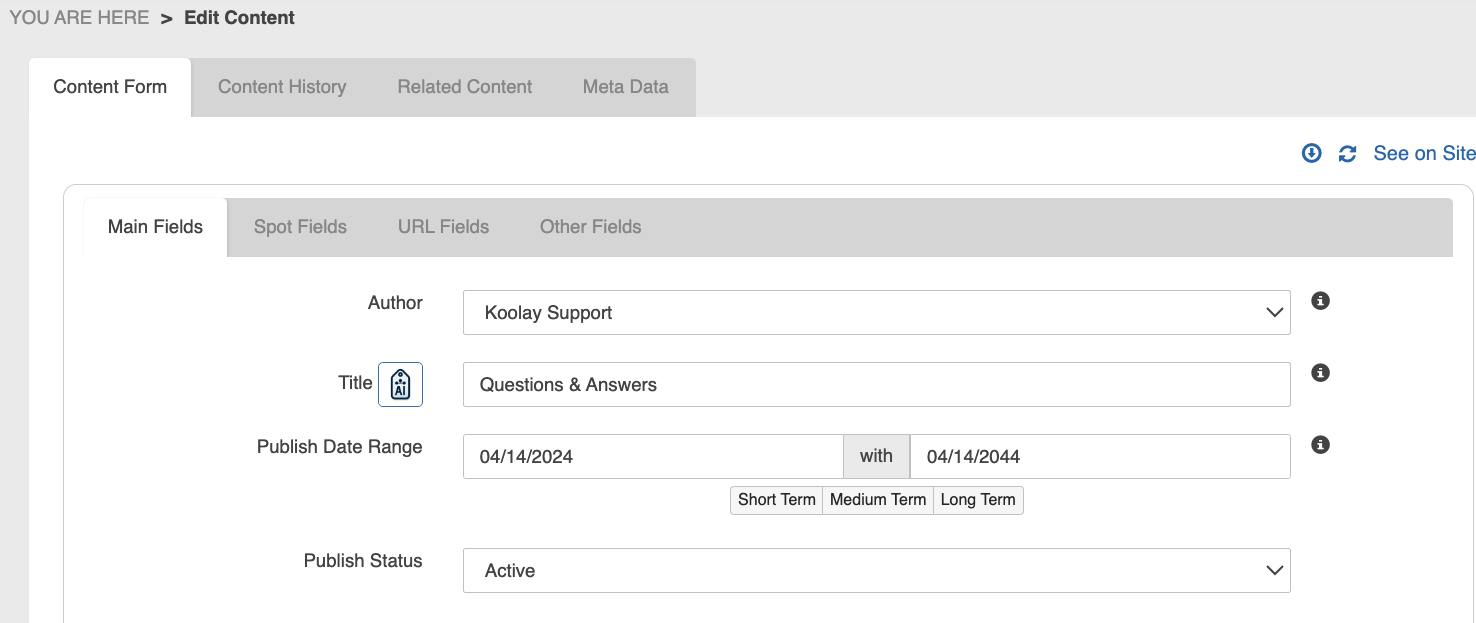
Make necessary changes, such as modifying the Author, Title, or other relevant details.
-
Save your changes by clicking the “Save Content” button.
Making Content Passive
-
Log into the Koolay Console with your credentials.
-
Locate the toolbar on the left side of the interface.
-
Click on the “Content” link and select “Content List.”
-
Identify the specific content to make passive by selecting its corresponding checkbox.
-
Access the “Selected Ones” dropdown menu.
-
Choose “Make Passive” from the dropdown to deactivate the selected content.
Moving Content
-
Log into the Koolay Console with your credentials.
-
Find the toolbar on the left side.
-
Click on the “Content” link and select “Content List.”
-
Identify the content you wish to move by selecting its corresponding checkbox.
-
Use the “Selected Ones” dropdown menu.
-
Select “Move” from the dropdown to relocate the selected content to another category.
Sorting Content
-
Navigate to the left-side toolbar.
-
Click on the “Content” link and choose “Content Sort.”

-
Select content and use the “Filter” button to sort the content based on specified categories.
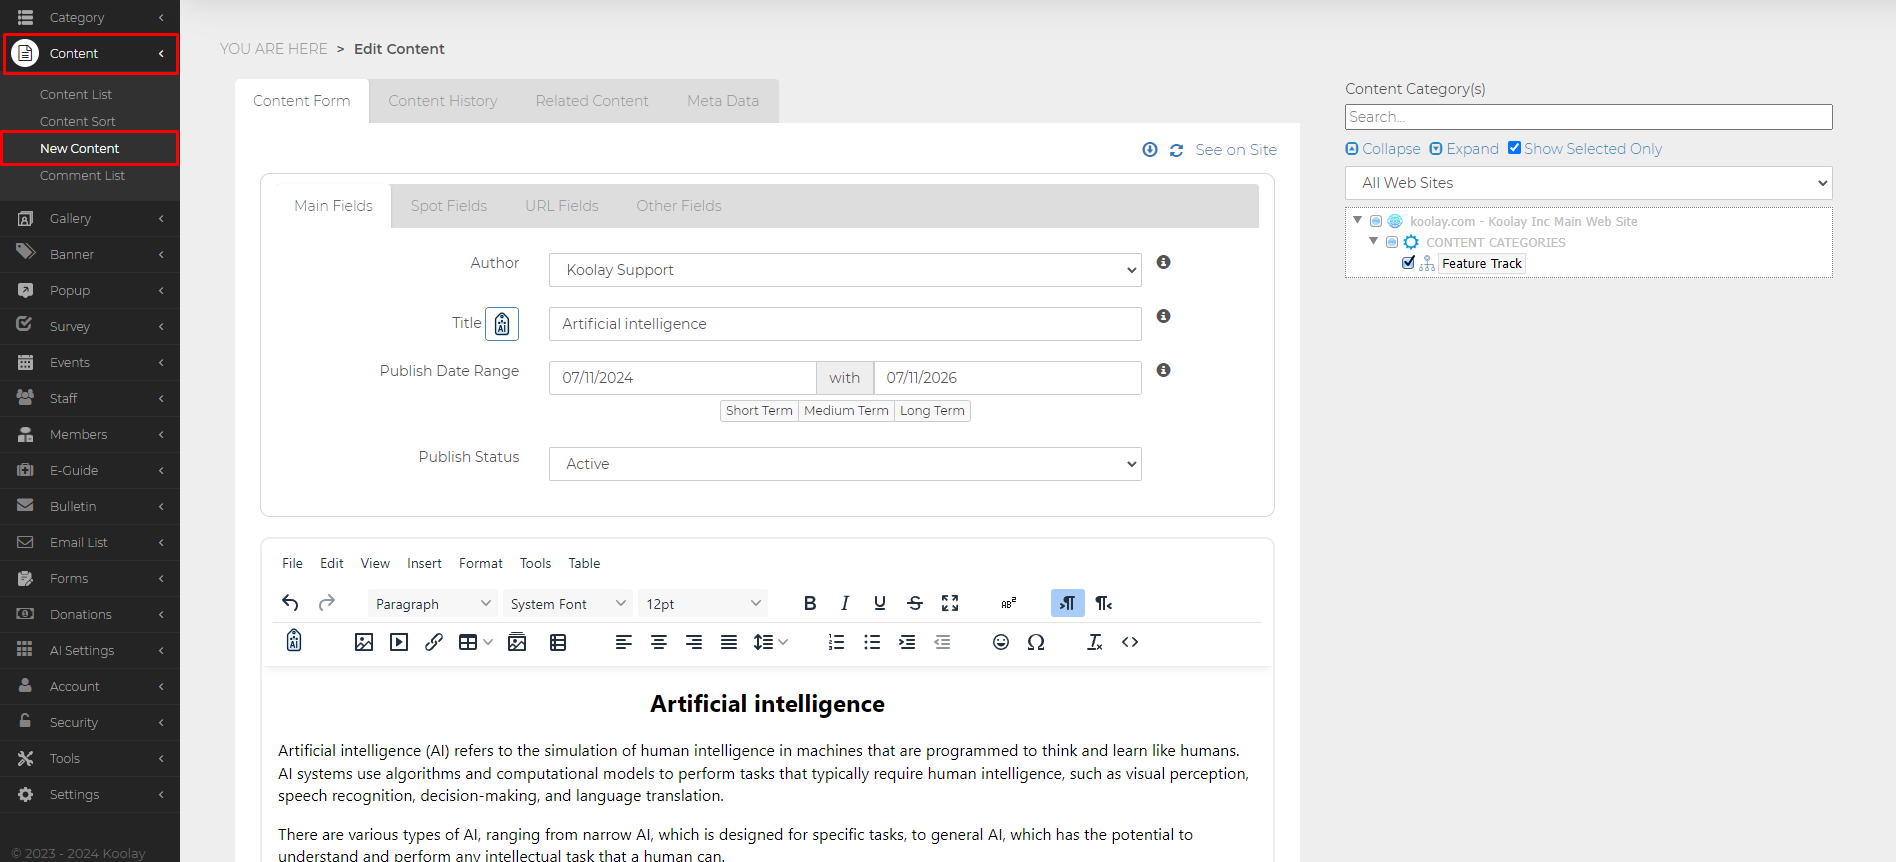
Creating New Content
-
Log into the Koolay Console with your credentials.
-
Locate the toolbar on the left side of the interface.
-
Select “New Content” from the “Content” link.
-
On the right-hand side of the page, under “All websites,” choose the specific website and page for the new content.
-
Complete the form fields, including uploading images, specifying titles, defining publication date ranges, or providing other details.

-
Ensure all fields are filled correctly and save your changes by clicking the “Save Content” option.
Category attribution
-
Login to the Koolay Console with your credentials.
-
Access the left-side toolbar.
-
Select “New Content” from the “Content” link options.
-
The "New Content" entry consists of two main sections:
-
-
Content defining fields
- Content editor
-
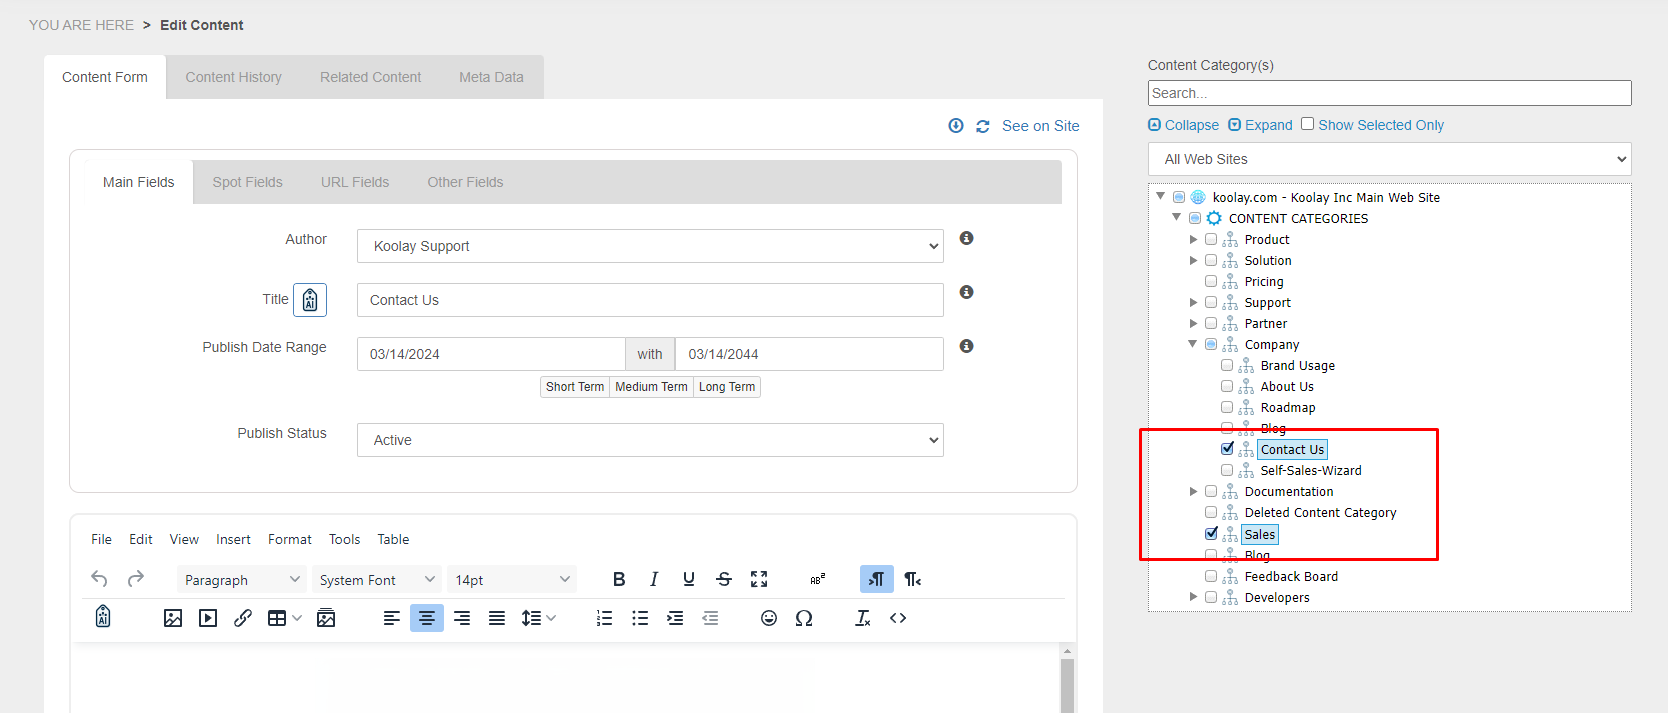
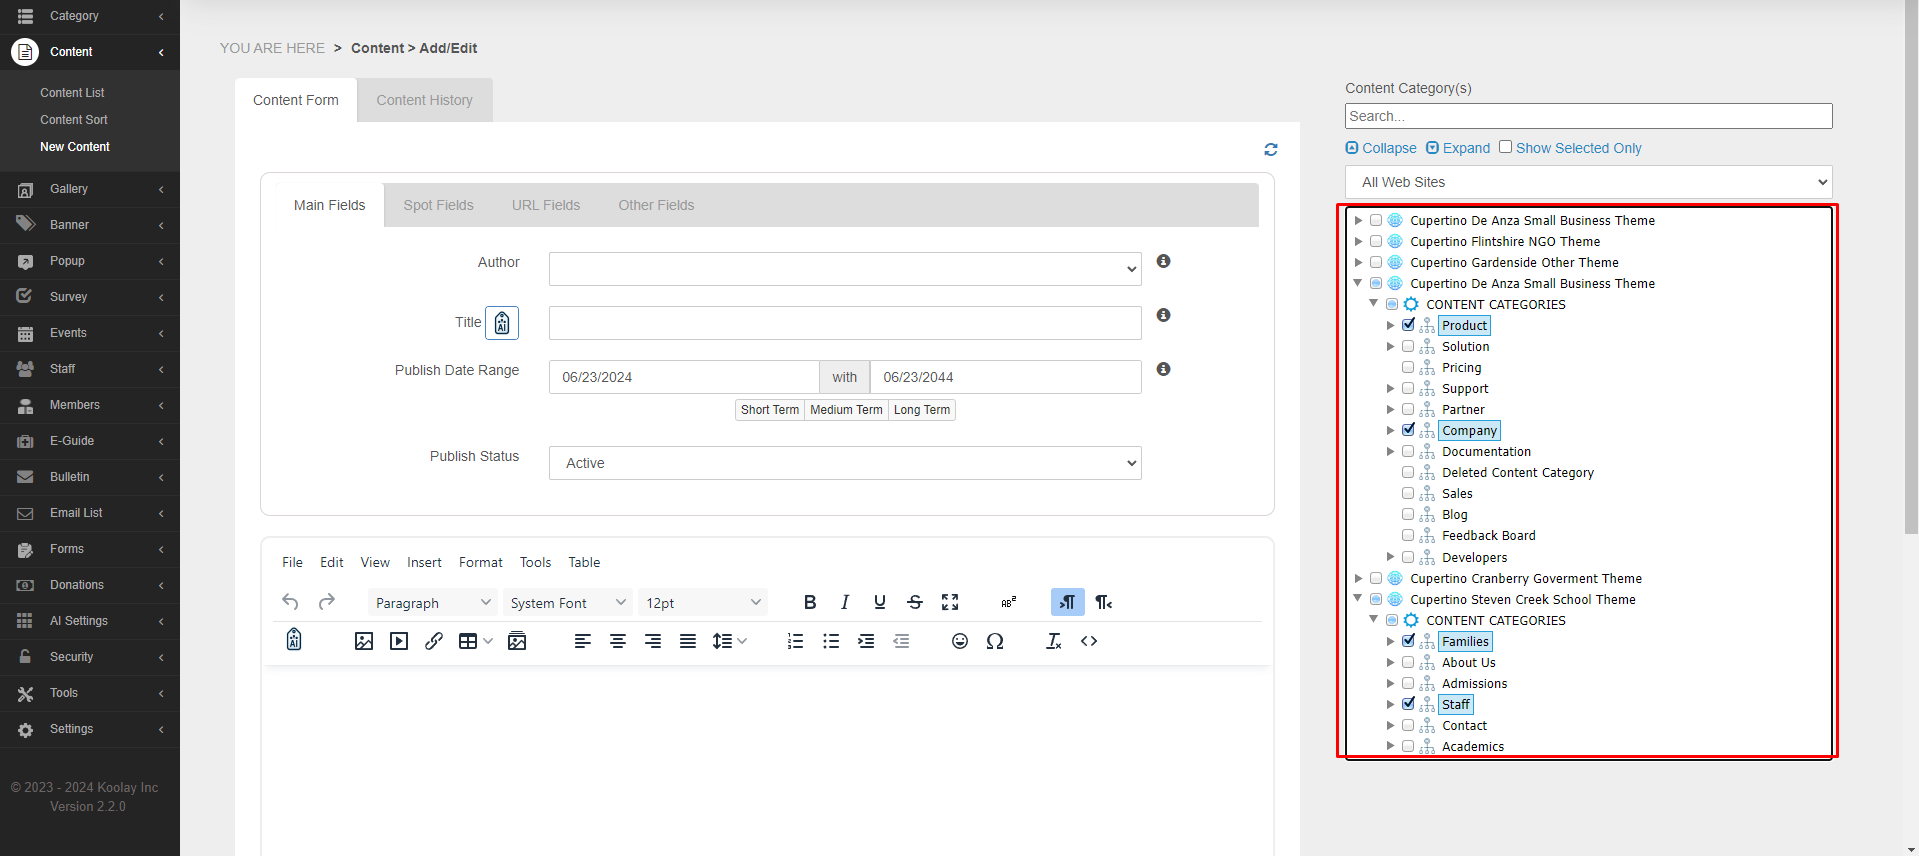
Each piece of content is associated with a category structure.
-
You can associate a piece of content with as many "Content Categories" as you want.
-
This means that the same content can be seen by site visitors under different menus and categories.
Content Editor Text Format
-
Login to the Koolay Console with your credentials.
-
Access the left-side toolbar.
-
Select “New Content” from the “Content” link options.
-
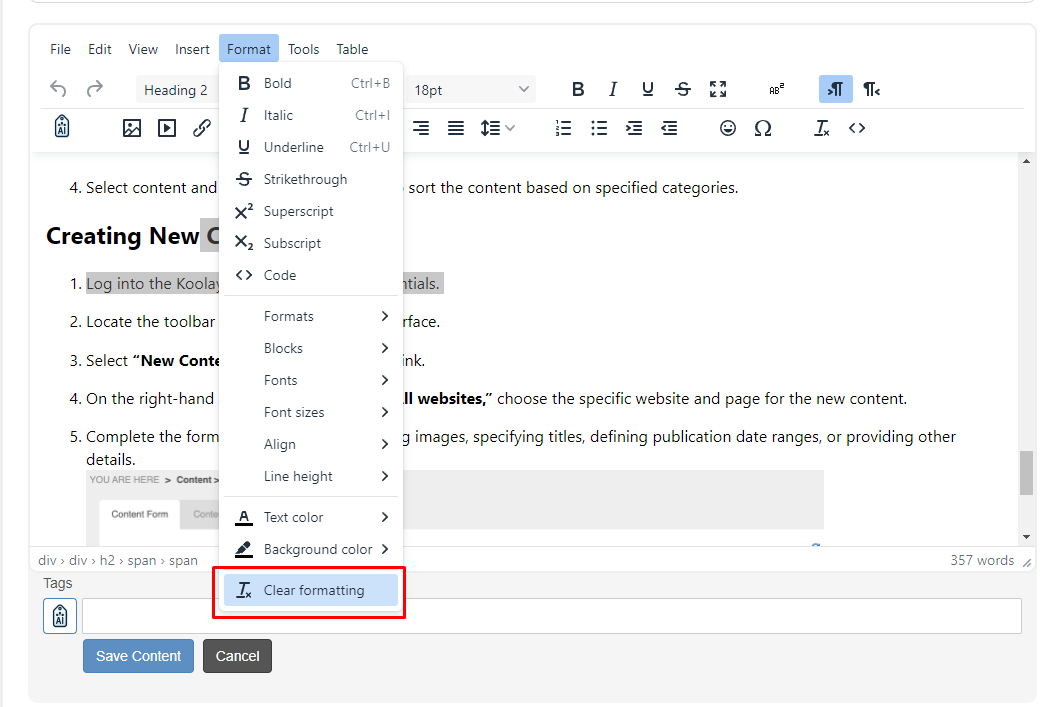
When you copy a formatted text from Word or any other source into the content editor, the text will retain its original formatting.
-
-
Example: The font size on your site might be 12 points, but the copied text could be 18 points or have other different formatting characteristics.
-
To make this text compatible with your site:
-
-
Select the text.
- Use "Content Editor" > Format > Clear Formatting to match the text with your site's format.
Content Undo and Redo
-
Login to the Koolay Console with your credentials.
-
Access the left-side toolbar.
-
Select “New Content” from the “Content” link options.
-
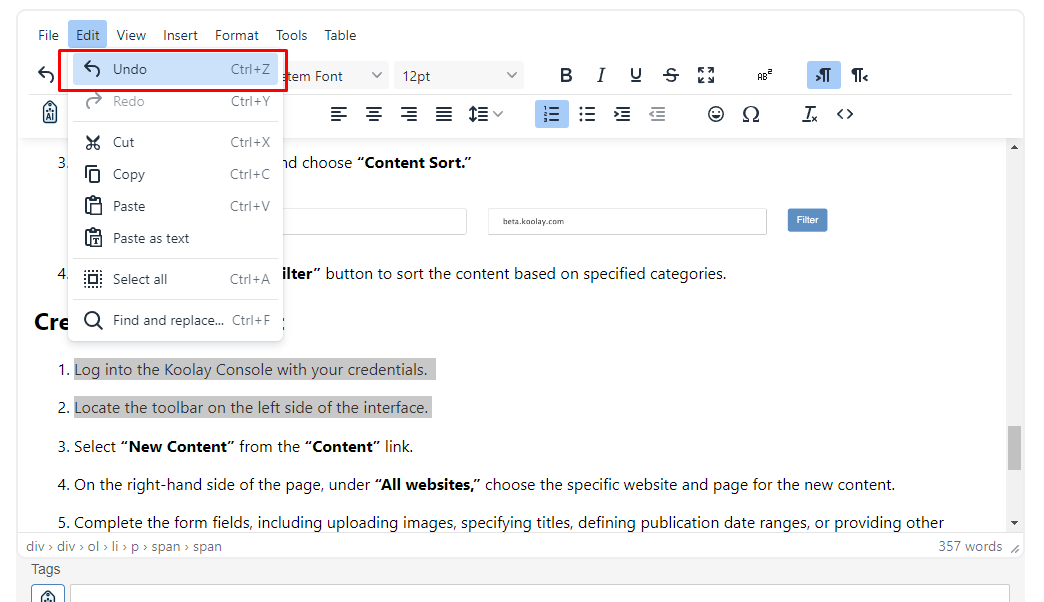
You can undo or redo every action you perform in the Content Editor.
-
-
Use the Control-Z key to undo an action.
- Use the Control-Y key to redo an action.
- Alternatively, you can use Menu > Edit > Undo.
Koolay AI Content Asistance
-
Login to the Koolay Console with your credentials.
-
Access the left-side toolbar.
-
Select “New Content” from the “Content” link options.
-
In the "Content Editor" toolbox, click the "AI" button on the far left to access the "Koolay AI Content Assistance" pop-up screen. 
-
-
This screen contains hundreds of pre-made AI prompts prepared by our company for content managers.
-
You can temporarily customize these prompts if needed.
-
-
Open the "AI Settings" module in the left modules list.
- You can create new categories, update existing prompts, or add new ones.
-
These prompts are exclusive to your company.
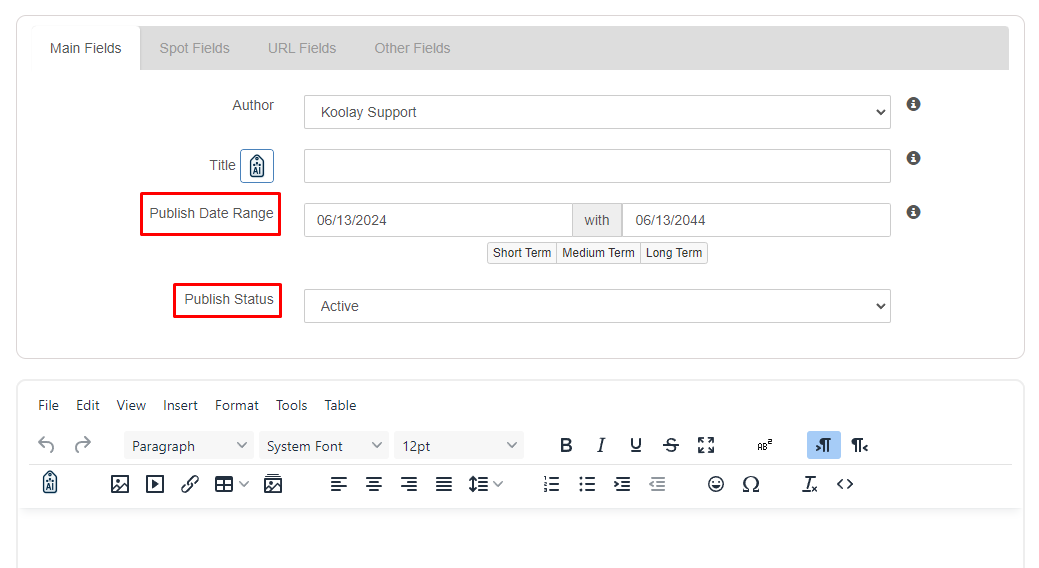
Content Publish Date Range and Publish Status
-
Login to the Koolay Console with your credentials.
-
Access the left-side toolbar.
-
Select “New Content” from the “Content” link options.
-
When updating content, pay attention to:
-
-
"Publish Date Range"
- "Publish Status"
-
The information you provide here will determine:
-
-
The timing of your content's publication.
- The status of your content's publication.
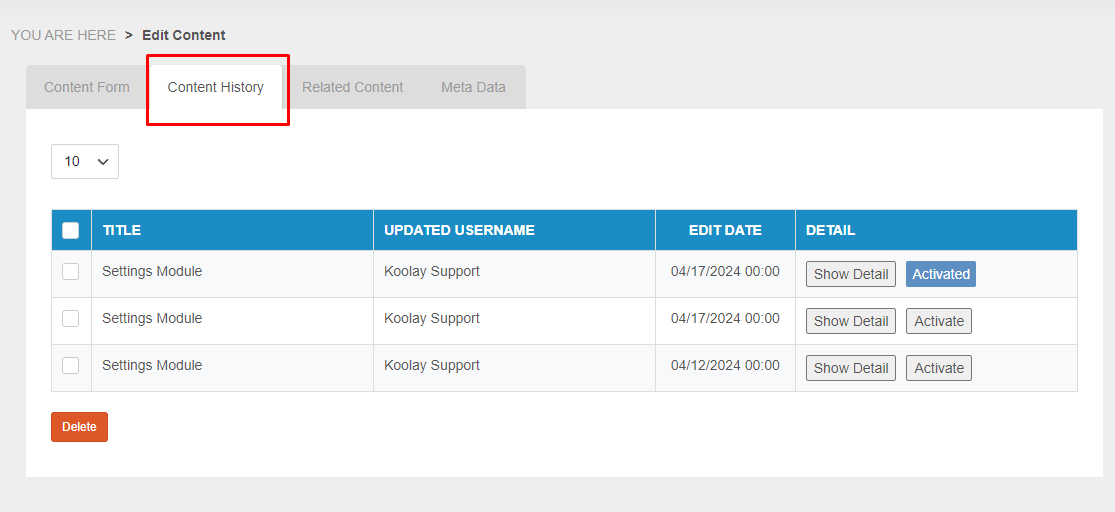
Content History
-
Login to the Koolay Console with your credentials.
-
Access the left-side toolbar.
-
Select “List Content” from the “Content” link options.
-
Select the content to edit.
-
Each time you save your content, it is recorded as a version of the respective content.
-
For example, if you update and save the content five times at different times:
-
-
Five versions of the same content will be stored under the "Content History" menu.
-
You can revert to a previous version at any time by:
-
-
Selecting "Activate" on the desired version.
Gallery Module
-
Login to the Koolay Console with your credentials.
-
Access the left-side toolbar.
-
Select “New Content” from the “Content” link options.
-
The Gallery Module allows you to save, organize, and list both images and videos simultaneously.
-
Each gallery requires a name for easy tracking.
-
To add a gallery to the content editor:
-
-
Click the "Gallery" button in the toolbox of the "Content Editor".
-
Select the desired gallery from the list.
-
Initially, the gallery content will not appear in the content editor.
-
After saving, you will see the gallery content listed in a different format:
-
-
When you preview it.
- When you view it on your site's front-end.
File Manager Tools
- You can access the File Manager not only from modules where content editing and image selection are performed but also quickly through the "Tools" module.
Access from modules where image selection is performed.
-
- Login to the Koolay Console with your credentials.
- Access the left-side toolbar.
- Select “Content List” from the “Content” link options.
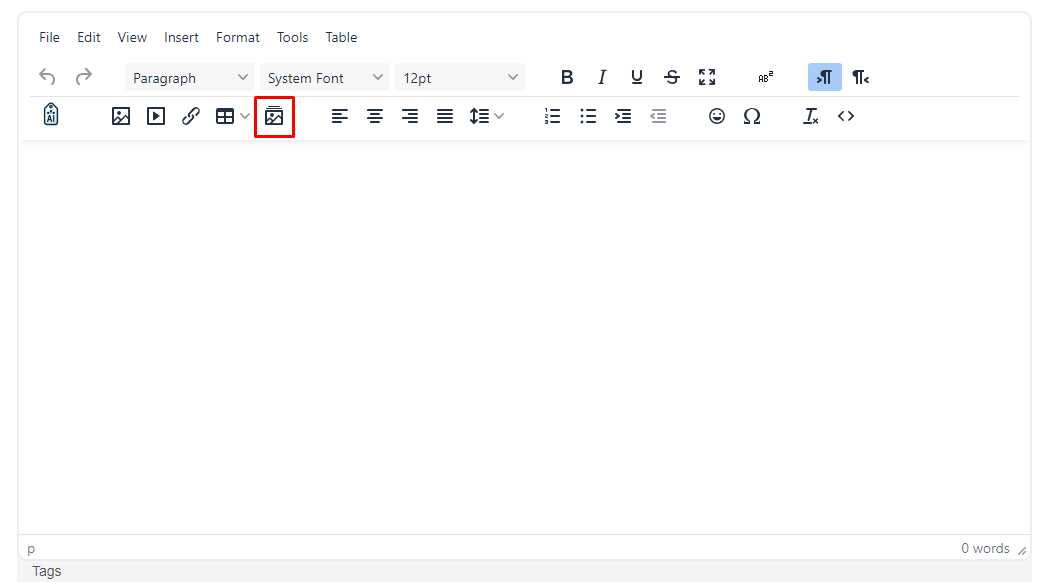
- Open a content that contains images.
- Click on the 'insert/edit image' button in the editor section.
- Press the 'source' button to access the File Manager.

2. Access from the 'Tools' module.
-
- Login to the Koolay Console with your credentials.
- Access the left-side toolbar.
- Select “File Manager” from the “Tools” link options.
Linking entered content to multiple sites
-if the plan you have is "centralized multi-site" feature, you can show the content you enter on multiple sites at once.
- Login to the Koolay Console with your credentials.
- Access the left-side toolbar
- Select “New Content” from the “Content” link options
- First enter the content you want to enter in the new content that opens.
- After entering the content, select which sites you want the content to be displayed on in the "Content Category(s)" box on the right.
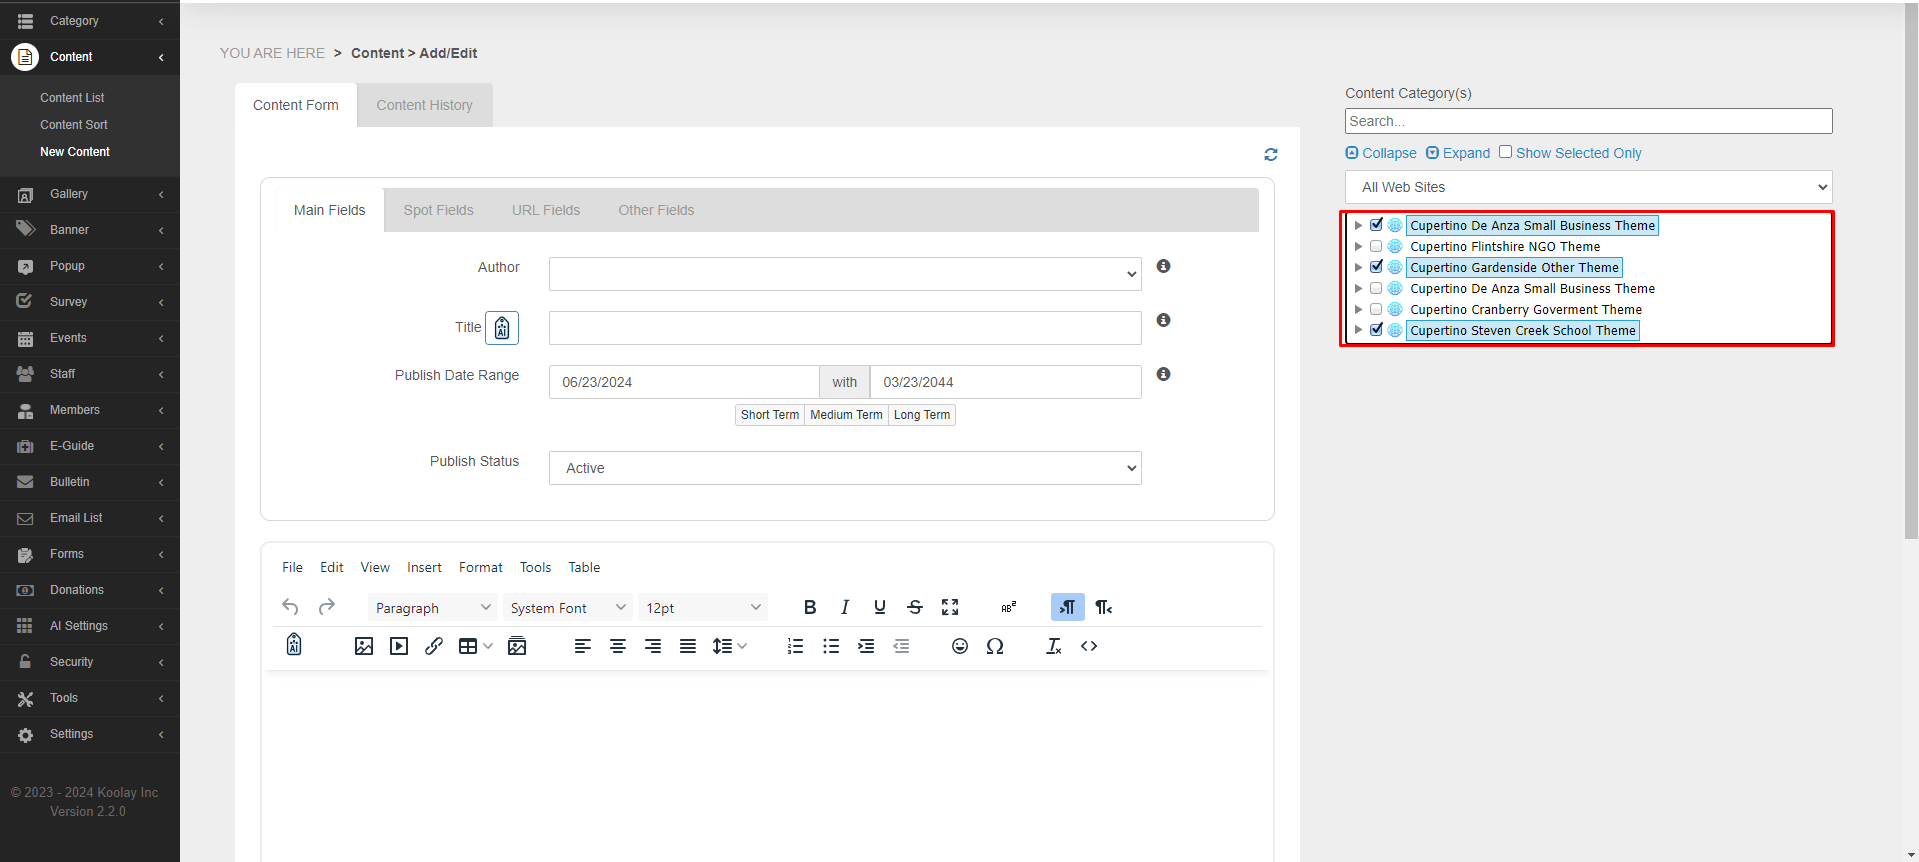
Multiple category selection when adding content
- Login to the Koolay Console with your credentials.
- Access the left-side toolbar
- Select “New Content” from the “Content” link options
- First enter the content you want to enter in the new content that opens.
- You can then select multiple categories within sites from the "Content Category(s)" box on the right side of the page to select multiple categories
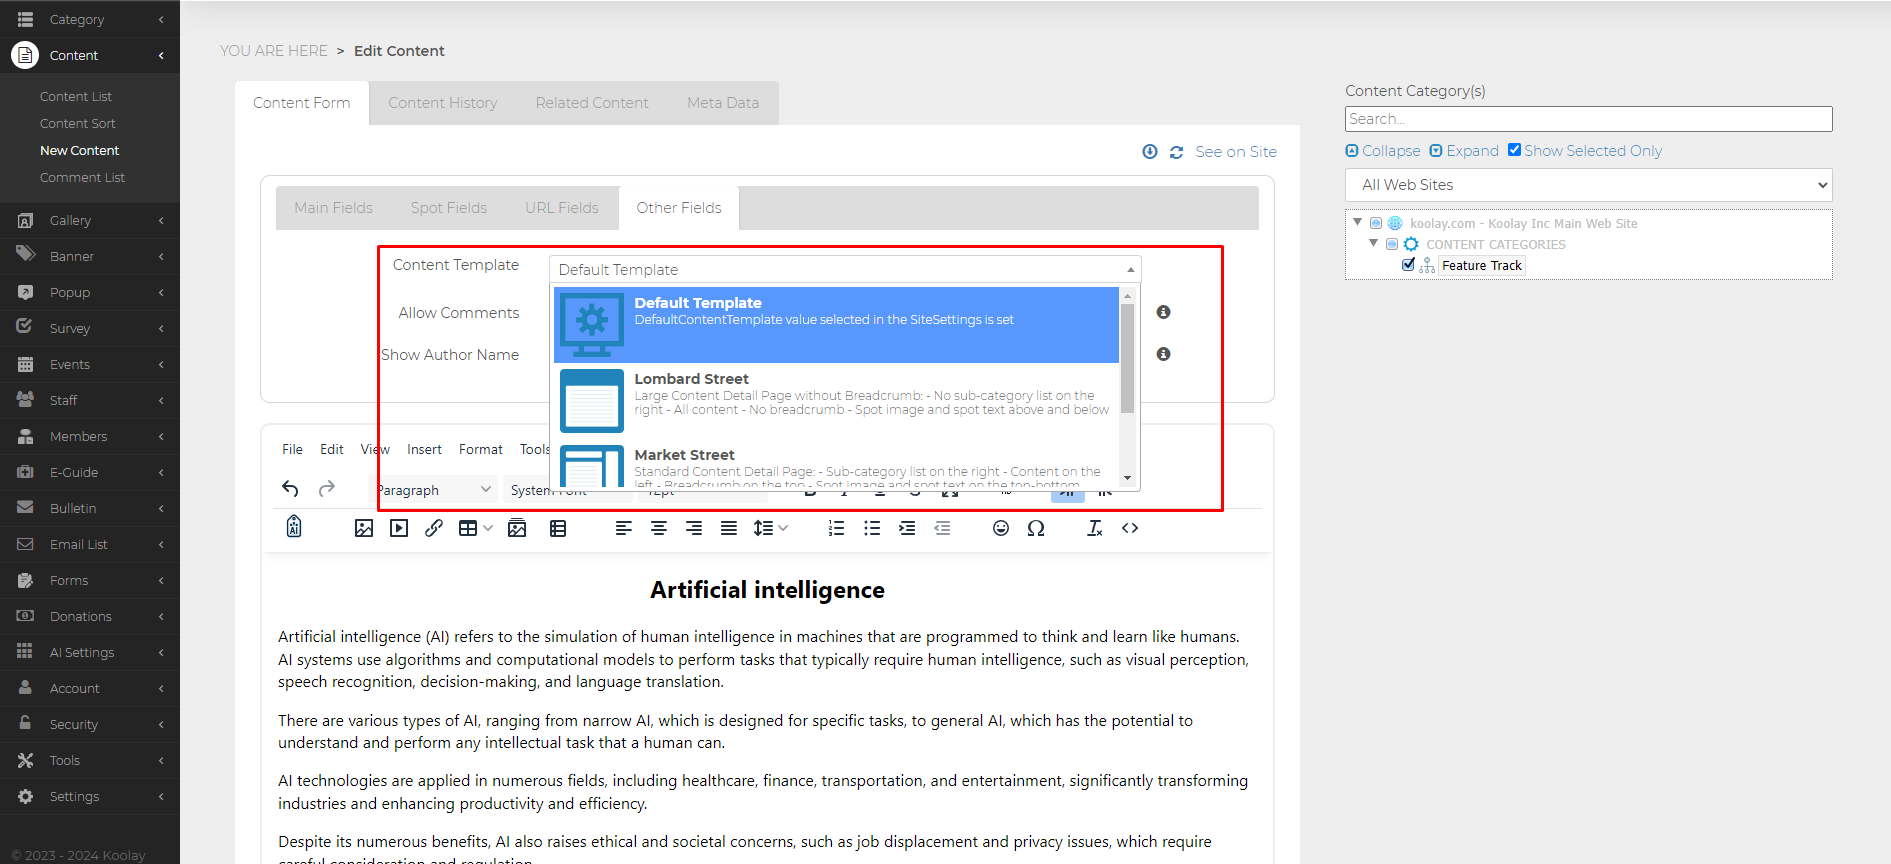
Content Templates
- To support different display formats for content and content list in Koolay Console, you can use the template feature for content and content list. This will minimize the manual formatting work you currently do and allow you to select content and content list templates.
- Open the "Content" tab in the left menu.
- Either add a new content with "New Content" or open the content editor of a content from the "Content List" page.
3. In the Content editor section on the right, open the "Other Fields" tab.
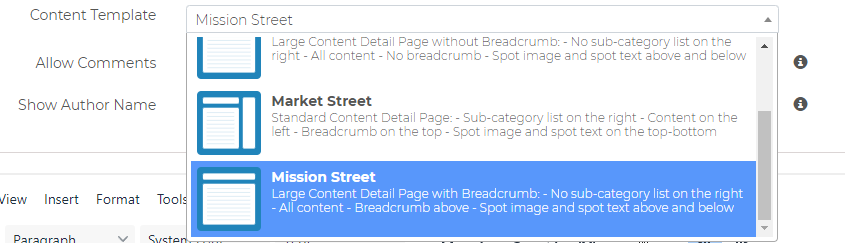
4. You can choose a template suitable for your content from the "Content Template" section.
5. Lombard Street - Large Content Detail Page without Breadcrumb:
Features:
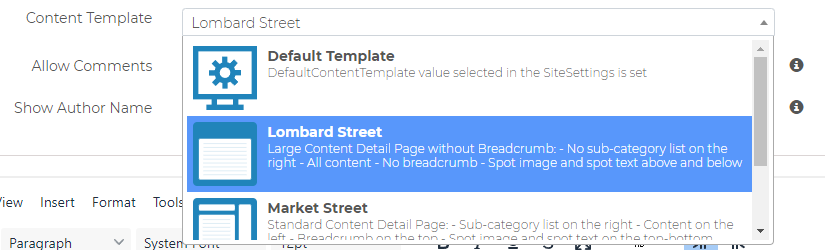
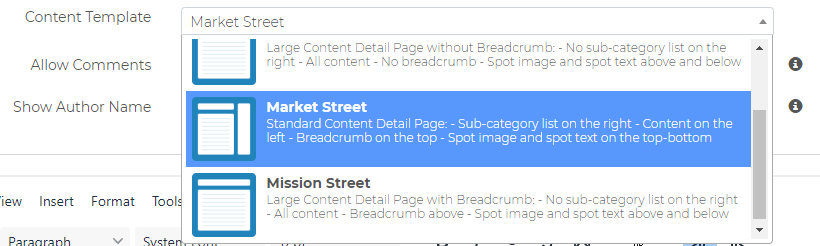
6. Market Street - Standard Content Detail Page:
Features:
7. Mission Street - Large Content Detail Page with Breadcrumb:
Linking a generated content with the appropriate module
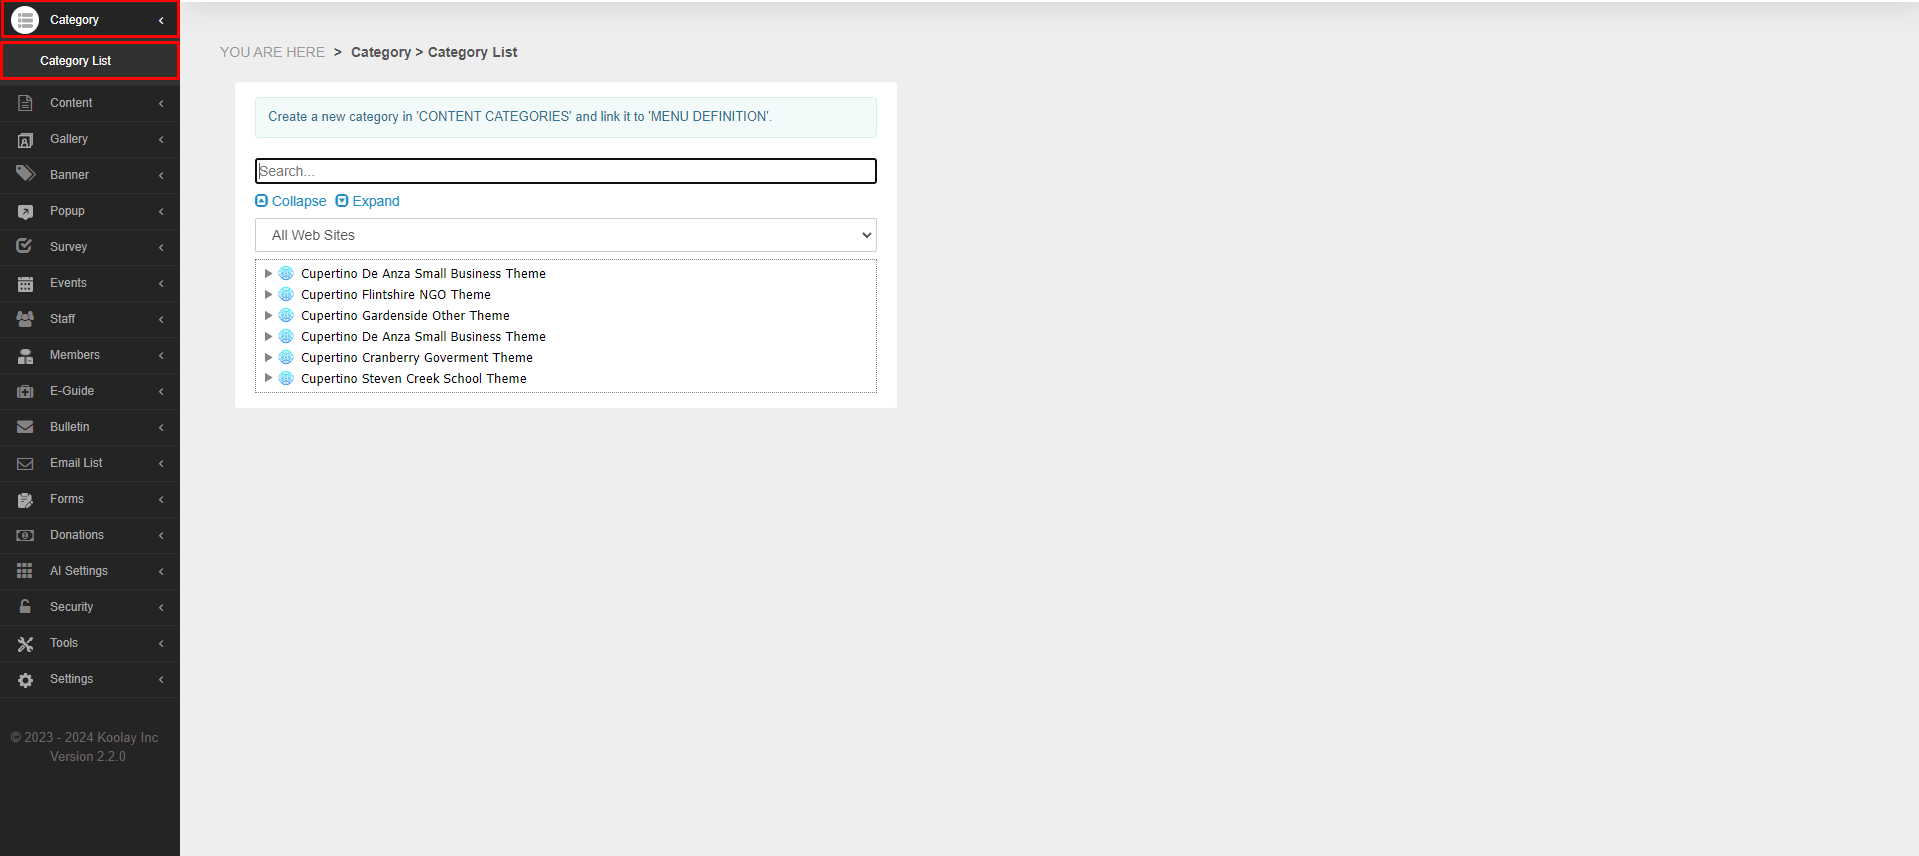
1. Open the "Category" tab in the left menu.
2. Open the "Categorry List" page.
3. Select the page you want to connect with the appropriate module.
- For example, let's link the document page in a support tab with a specific module.
4. Find the "Menu Type" setting in the "Basic Information" section.
5. Mark this setting as "Module".
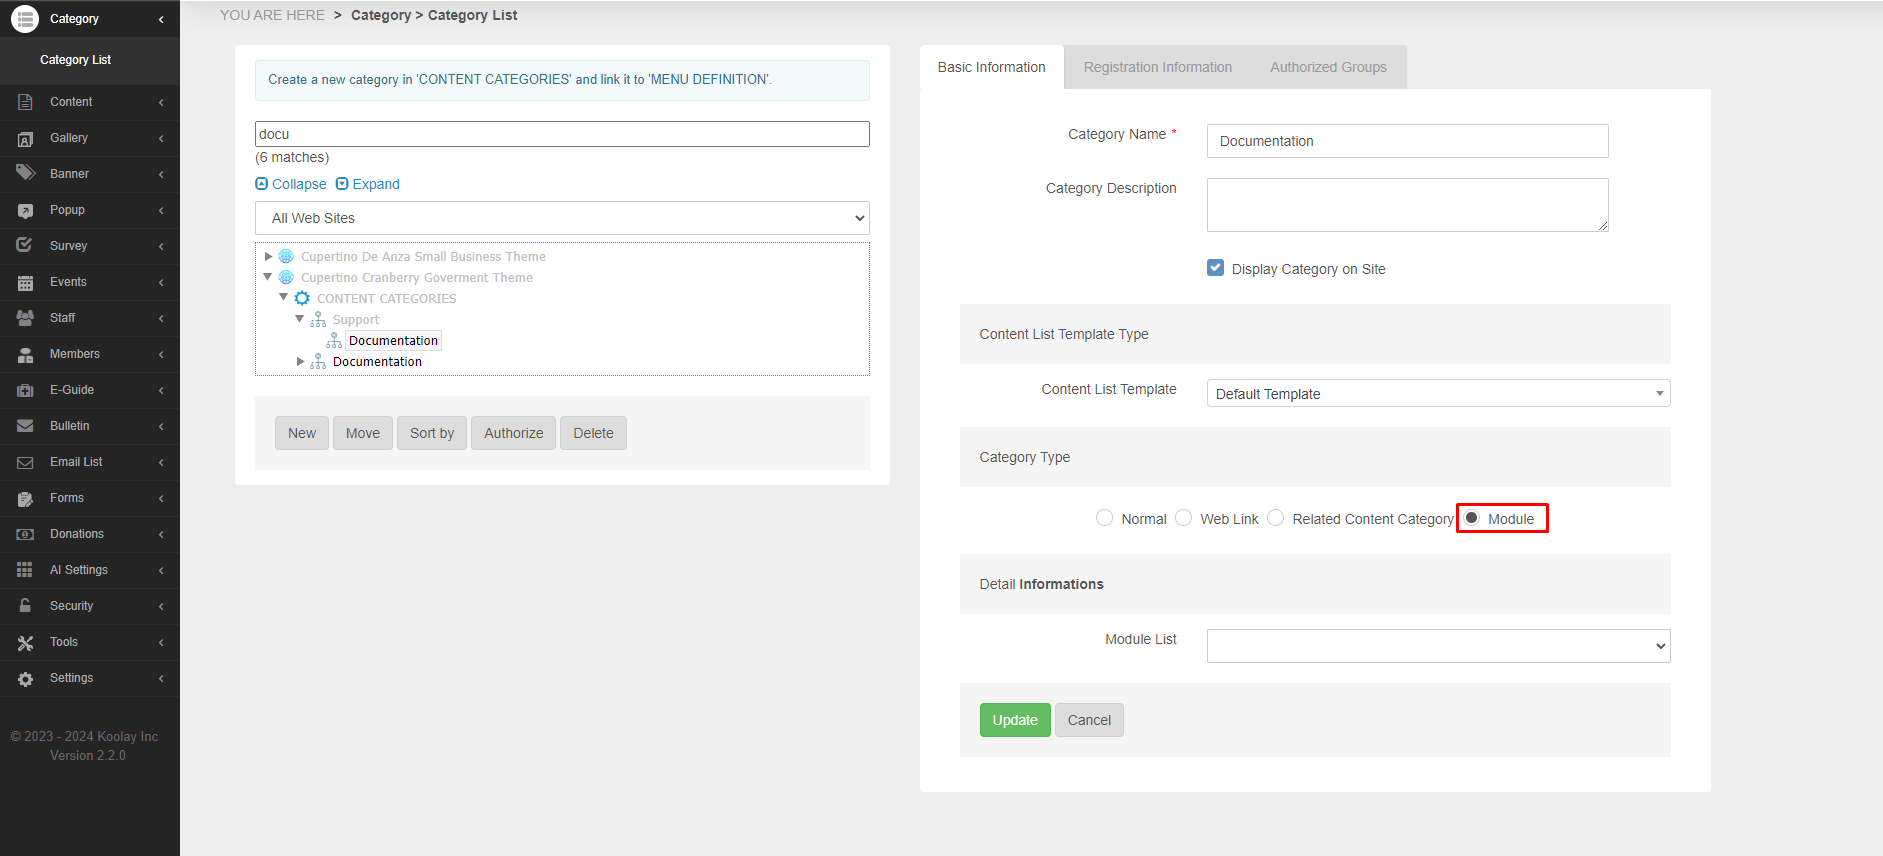
6. Select "Document" from the "Module List" section just below.
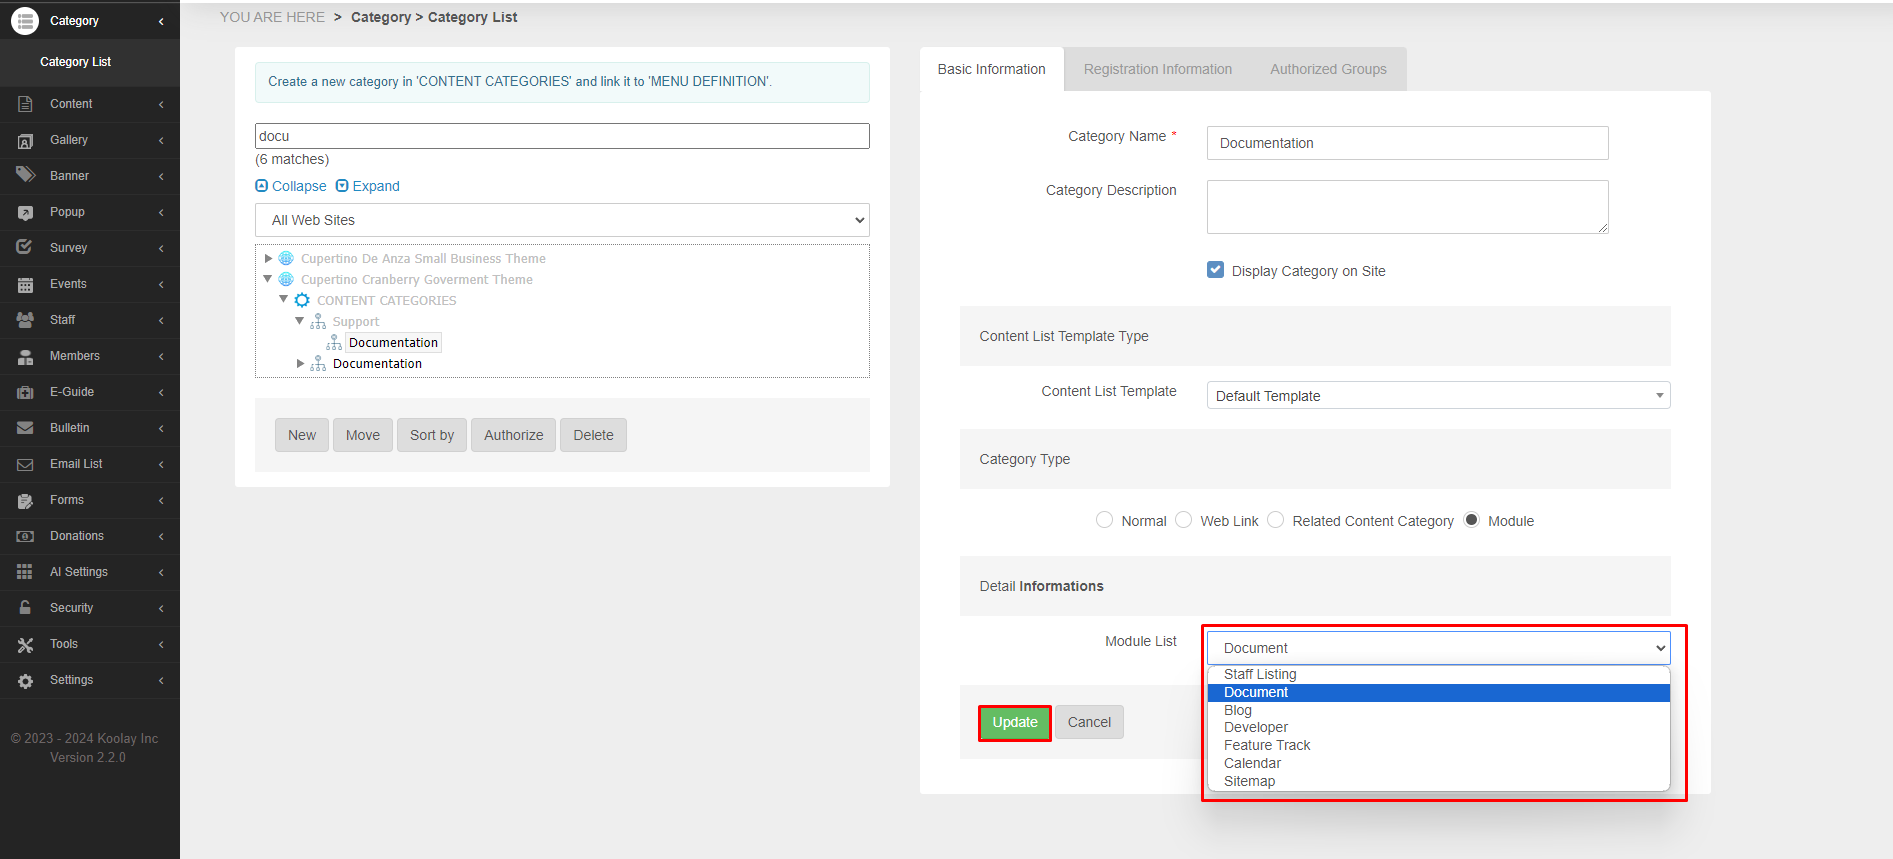
7.Finally press the "Update" button.
- You can select the desired page type from the "Module List" section. The page format and link will change according to the module type you choose.
Last updated on 2024-04-13 00:52:14Z by Koolay